Managing Appointments in a Synced Diarybook Environment
Overview
This guide is for organizations using Diarybook’s messaging service to sync appointment data. It explains how to access and manage appointment reminders for specific clinic modalities assigned to users.
How It Works
Syncing Appointments
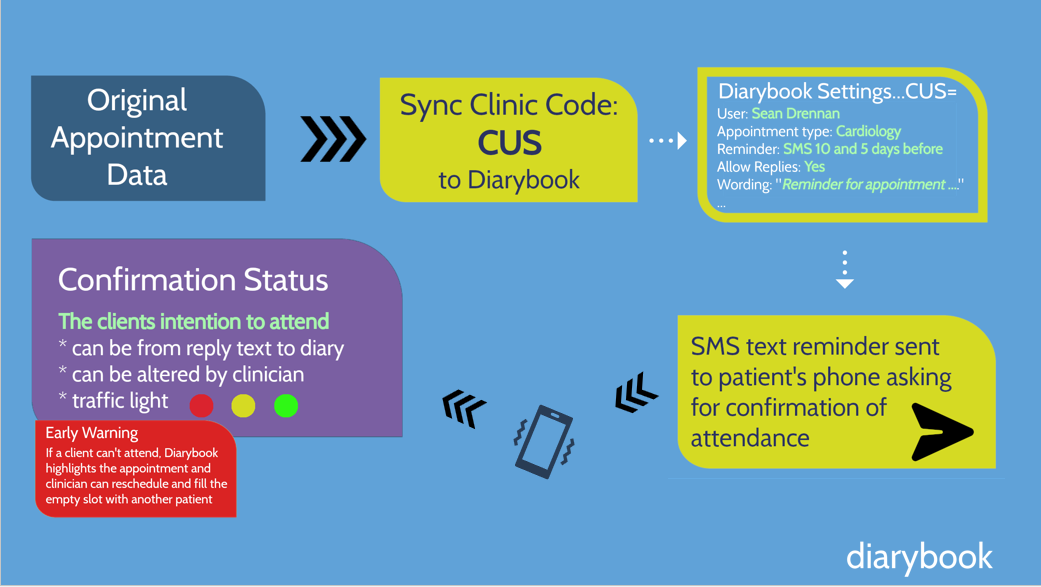
- Appointments are synced (copied) from the original source (e.g., a hospital patient management system) to Diarybook.
- Each appointment includes a clinic code (or sync code), which represents a modality, department, location, or appointment type.
- Example: Appointments with the code C.U.S. are synced and assigned to user Shawn with the appointment type Cardiology.
Processing Appointments
- Diarybook uses the clinic code to determine:
- Which user the appointment is assigned to.
- The type of reminder to send (e.g., SMS).
- When to send reminders (e.g., 5 and 10 days before the appointment).
- Whether to allow patient replies.
Sending Reminders
- Once synced, a text reminder is sent to the patient, asking them to confirm attendance.
- When the patient replies, Diarybook automatically reads the message for keywords and updates the appointment’s confirmation status.
Viewing Confirmation Status
- Users (e.g., Sean) can easily see which patients will attend, decline, or are uncertain.
- Status indicators:
- Green circle: Confirmed.
- Red circle: Unable to attend.
- Yellow circle: Maybe/tentative.
- Grey circle: No status given.
![]()
Accessing Diarybook
Step 1: Welcome Email
- When your account administrator adds you to Diarybook, you’ll receive a welcome email.
- Follow the instructions to set your password.
Step 2: Sign In
- Open your browser and go to: portal.diarybook.com.
- Enter your email and password, then click Sign In.
- If prompted, select Continue to use the latest version.
Navigating the Appointment List
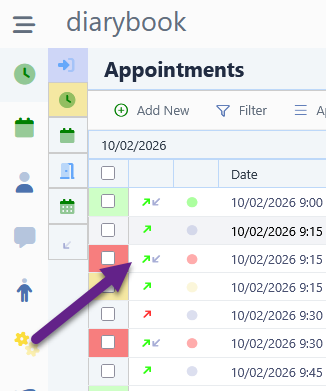
Viewing Appointments
- After signing in, click the Clock icon to view your appointments.
- The list displays only appointments assigned to you (unless permissions allow otherwise).
Understanding the List
- Each row represents an appointment.
- Status symbols:
- Green arrow (↗): Reminder sent.
- Grey arrow (↙): Reply received.
- Circle icon: Confirmation status (green, red, yellow, or grey).
- Columns include:
- Date and time.
- Patient name.
- Appointment type/modality.
- Assigned user.
Viewing Appointment Details
- Click on an appointment to see:
- Synced details.
- Reminder message sent.
- Patient’s reply (if any).
Managing Confirmation Status
Changing Status
- Select one or more appointments by ticking the checkboxes.
- Click the Appointments Menu.
- Select Change Confirmation Status and choose the appropriate option.
Viewing Replies and Handling Multiple Appointments
Viewing Replies
- To see all replies for a given day, click Received in the sub-menu.
- Click on a reply to open the appointment record under the SMS tab.
- Reply to the patient or manage the appointment using other tabs.
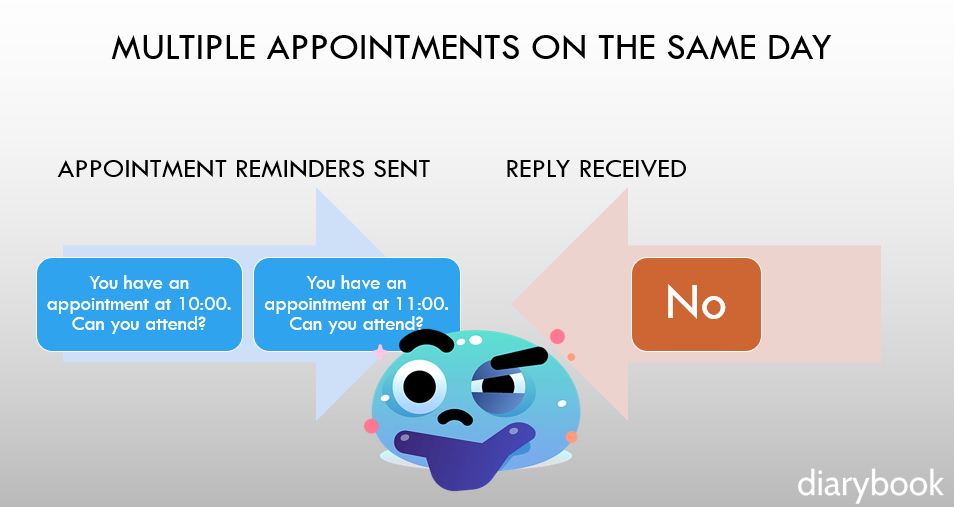
Handling Multiple Appointments
- If a patient has multiple appointments on the same day, SMS replies may lack context.
- Diarybook logs the reply with each appointment, marks it as Maybe, and adds a note that the patient’s intention is unclear.
Adding Users to Your Account
Organizing Users
- For large accounts, organize users into Departments (e.g., Cardiology, Radiology).
Adding a Department
- Go to Settings > Departments.
- Click Add Department and enter a name.
Adding a User
- Go to Settings > Users > Add New.
- Enter the user’s first name, last name, and email.
- Select their department.
- Under General Permissions, assign privileges:
- Can take appointments: Access their own appointments.
- Can view/edit department appointments: Access and modify appointments for their department.
- Click Save. A welcome email will be sent to the user.
Conclusion
This guide provides an overview of appointment management in a synced Diarybook environment. Whether you’re a single user or part of a team, Diarybook helps you stay organized, collaborate efficiently, and manage patient appointments seamlessly.
On this page