Appointment Management
The Appointment Window
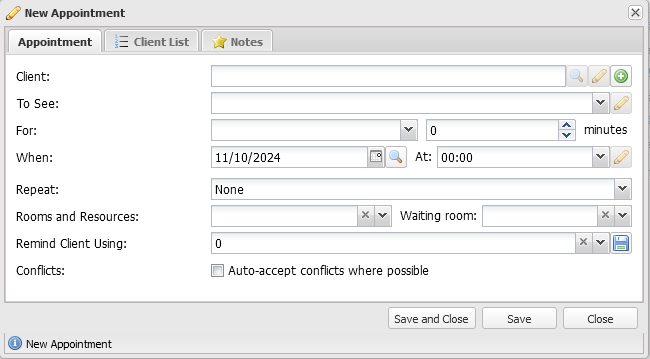
This section describes the fields in the appointment window. The appointment window allows the user to add and edit appointments.

Opening the Appointment Window
There are various ways the user can open the window.
Adding
- By clicking the NEW APPOINTMENT button in the Top Margin of the application
- By clicking the plus icon in the tool bar within the Appointments tab
- By selecting Add New Appointment in the APPOINTMENTS MENU within the Appointments tab
Editing
- By clicking the pencil icon in the tool bar within the Appointments tab
- By selecting Edit Appointment in the APPOINTMENTS MENU within the Appointments tab
- By double-clicking the appointment in the appointments list
- By clicking on an appointment in the Calendar tab
- By double-clicking an appointment in the appointment history grid in the client’s tab
Appointment Fields
| Field | Description | Notes |
|---|---|---|
| Client | The client the appointment is for | The magnifier button opens the client in a new tabThe pencil button opens the client for editingThe plus button opens the new client window |
| To See | The user the appointment is with | The pencil button opens the user for editing |
| For | The type of appointment | |
| When | The date of the appointment | The calendar button allows selection of the date |
| At | The time of the appointment | Type in or select from drop down listThe pencil opens the user’s opening hours for editing |
| Repeat | Period to create repeat appointments | Pick from weekly, fortnightly, 3 weekly and 4 weekly |
| Total Number of Appointments | The total number of appointments to be created when the SAVE button is clicked | This field only shows when the Repeat value is anything other than None. |
| Duration | The duration of the appointment in minutes | |
| Using Room / Resource | The room or resource to book | The X button clears the entry |
| Remind Client Using | The schedule to use to send the appointment reminder | The X button clears the entryThe disk button saves this as the user’s default setting |
| Conflicts | Certain time-conflicts can be overridden | |
| Notes | Notes for the appointment | If an appointment has a note a star is shown in the appointments list |
Adding and viewing appointments
This is a quick overview for adding a new appointment.
Add An Appointment
To add an appointment the user should do the following:
- In the Top Margin click the
New Appointmentbutton - The New Appointment window will appear
- In the
CLIENTfield, begin to type the client’s name. The user will be offered a list of matching clients - Select the client from the list
- In the
TO SEEfield drop down, select the user that the client is to see - In the first
FORfield drop down, select the type of appointment. In the second field select the number of minutes duration of the appointment. This may be auto-populated when the type of appointment is selected. - In the
WHENfield either type the date of the appointment or click the calendar button to the right to select the date from the calendar that pops up - In the
ATfield either type the time of the appointment or click the drop down to select the time from the list - Optionally, in the
REPEATfield select the period of time repeat appointments should be made and how many appointments to make - Optionally, pick one or more rooms and resources in the
ROOMS AND RESOURCESfield to book those resources - In the
REMIND CLIENT USINGfield select the reminder schedule to use or leave blank if no reminder is to be sent - In
CONFLICTSyou can tick auto-accept conflicts to accept the appointment overlapping with other events. - To enter notes for the appointment, click on the
NOTEStab - Click the SAVE button to save the appointment
Conflicts and Double Booking
We recommend to leave the conflict box unchecked. diarybook will prompt the user with any conflicts that would arise from saving the appointment. If the user is has permission, diarybook will give the user the choice of accepting the conflict(s).
With the conflict box checked, diarybook will automatically accept the conflicts if the user has permission to do so. However the user will be unaware of the conflict.
For more information read Understanding Time Conflicts
Editing Appointments
When editing an appointment first highlight the appointment in the Appointments tab, then:
- By clicking the pencil icon in the tool bar within the Appointments tab
- By selecting Edit Appointment in the APPOINTMENTS MENU within the Appointments tab
- By double-clicking the appointment in the appointments list
- By clicking on an appointment in the Calendar tab
- By double-clicking an appointment in the appointment history grid in the client’s tab
Viewing Appointments
To view the list of appointments on the account for the specific day used the user should do the following:
- In the Left Margin click the required day in the date picker
The Appointments tab will appear in the application showing the appointments for the day selected.
Appointments Tab
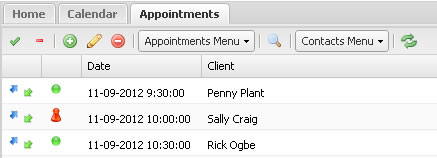
The appointments tab is the main screen of diarybook where all appointments can be viewed and maintained.

The tab consists of the following:
- A tool bar containing buttons and menus
- An appointments grid showing appointments that match the users search criteria
- A message grid showing messages
Tool Bar
The tool bar contains buttons and menus.
Appointment Tool Bar Buttons
| Button | Description | Notes |
|---|---|---|
 | Select all appointments in the grid | |
 | Deselect all appointments in the grid | |
 | Add a new appointment | |
 | Edit the appointment | the first selected appointment |
 | Delete appointments | all selected appointments |
 | Open contact in new tab | Selects client from the first selected appointment |
 | Refresh the appointment grid | based on the users current search criteria |
Appointments Menu
| Menu Option | Description | Notes |
|---|---|---|
| Add Recall Record | Add a recall record | See Recalls |
| Edit Record | Edit the appointment | The first selected appointment |
| Delete Record(s) | Delete appointments | All selected appointments |
| Confirmation Status | Alter confirmation status | All selected appointments.See the confirmation status icons below. |
| Attendance Status | Alter the attendance status | All selected appointments.See the attendance status list below. |
| Send Message | Send a message to clients | Selects clients from all the selected appointments |
| Other Actions - Reset Reminder Status | Alters the appointments reminder status to Not Sent. | Affects all selected appointments. This could cause clients to receive more than one appointment reminder. |
| Refresh | Refresh the appointment grid | based on the users current search criteria |
Clients Menu
| Menu Option | Description | Notes |
|---|---|---|
| View Client | Open contact in new tab | Selects client from the first selected appointment |
| Add New Client | Add a new client | |
| Edit Client | Edit a client | Client picked from the first selected appointment |
Appointments Grid
The grid contains the list of appointments that match the users current search criteria
| Column | Description | Notes |
|---|---|---|
| Reminder Status | Icon indicating if reminder has been sent and if a reply has been received | See the reminder status icons below |
| Confirmation Status | Icon indicating the confirmation status of the appointment | See the confirmation status icons below |
| Date | The appointment’s date and time | |
| Client | The name of the client the appointment is for | |
| Appointment Type | The type of appointment | |
| End | The time the appointment booking ends | |
| Resources | The resources booked by the appointment | |
| To See | The user the appointment belongs to | |
| Notes | Icon indicating if the appointments has notes | If the appointment has a note, a star icon appears in this column. Hover pointer over star to see note |
| Status | Text indicating the status of the appointment | This status is taken from the confirmation and attendance status of the appointment |
Reminder Status Icons
| Icon | Description |
|---|---|
 | A reminder message has been sent from diarybook to the client |
 | A reply has been received from the client |
Confirmation Status Icons
The confirmation status indicates the client’s intention and is relevant before the appointment time.
| Icon | Description |
|---|---|
| There is no confirmation status | |
 | The appointment has been confirmed |
 | The appointment has been cancelled by the client |
 | The client is unsure if they can attend |
 | The appointment has been cancelled by the user |
Attendance Status
The attendance status is relevant during and after the appointment time. It can indicate that the appointment is complete to the client not showing up.
| Status | Description |
|---|---|
| There is no attendance status | |
| In waiting room | Client is currently in the waiting room |
| Active | The client is currently with the user |
| Finished | The client’s appointment has ended and has left |
| DNA | The client did not attend (DNA) |
| Was contacted | The client remote consultation completed |
| Contact failed | The remote consultation failed to happen |
Messages Grid
This grid contains any messages passed between diarybook and clients including appointment reminders and their replies. To view messages for a particular appointment simply highlight the appointment in the appointments grid.
| Column | Description | Notes |
|---|---|---|
| Message Status | See message status icons below | |
| Date | The date and time the message was sent or received | |
| Message | The text of the message | |
| To | The email address or mobile number the message was sent to | |
| Status | Description of the message status | See message status list below |
Message Status Icons
| Icon | Description |
|---|---|
 | A text reminder has been sent but there was no delivery confirmation |
 | A reminder has been sent and delivery was confirmed |
 | The reminder failed to be delivered |
 | The reminder message has timed out trying to deliver |
 | A reply has been received from the client |
Message Status Descriptions
| Status | Description |
|---|---|
| Pending | The reminder message is pending and will be sent by the system shortly |
| Sent | The reminder message has been sent out |
| Delivered | Text reminder - the message was confirmed as delivered |
| Delivery Failed | Text reminder - the mobile network failed to deliver the message |
| Expired | Text reminder - the mobile network has given up trying to deliver the message |
| In Stop List | The mobile number or email address of the client is in the Stop List preventing the message being sent |
Calendar Tab
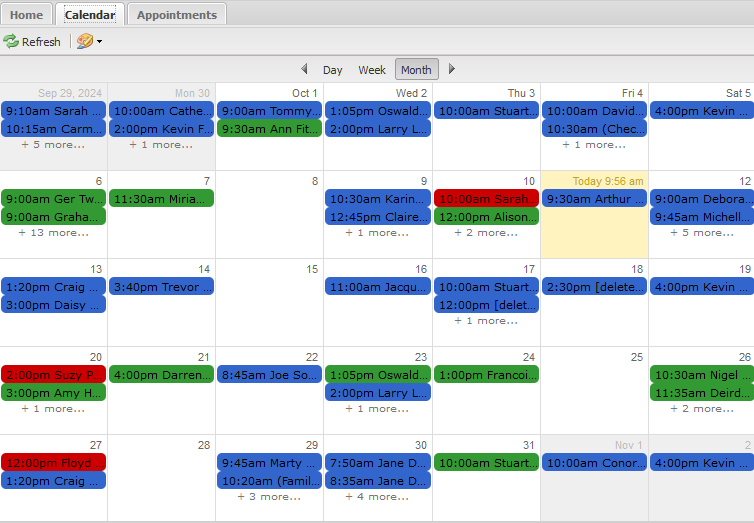
The calendar tab gives the user a visual representation of their appointments.

Views
It contains the appointments that match the users current search criteria and organises them in to 3 views:
| View | Description |
|---|---|
| Day | Shows 2 days side by side with the time on the left margin |
| Week | Shows all 7 days side by side with the time on the left margin |
| Month | Shows all days of the month with each day represented as a box |
Appointments are represented by coloured boxes. The colour represents the confirmation status of the appointment (see below). The user can simply click on an appointment to edit it. The user is unable to add an appointment from this tab.
Dragging and Stretching
Appointments can be dragged and stretched as a way to change the time, date and duration.
| View | Drag | Stretch |
|---|---|---|
| Day | Drag to change time and/or to other day | Stretch to change the duration of the appointment |
| Week | Drag to change time and/or day of current week | Stretch to change the duration of the appointment |
| Month | Drag to change the day in current month | Cannot stretch |
Appointment Colours
There are 2 colour modes that the calendar can be in: Confirmation Status and Appointment Types. In Confirmation Status mode the colour of each appointment reflects the confirmation status of that appointment (see table below).
In Appointment Type mode the appointment colours are determined by the appointment type which is customized by the user. See the section on Appointment Types for information on customizing colours.
Confirmation Status Colours
| Colour | Status |
|---|---|
| Blue | The appointment has no status |
| Green | The appointment has been confirmed |
| Red | The appointment has been cancelled |
| Yellow | The client is unsure of ability to attend |
To change the colour mode the User selects the palette icon  in the Calendar tool bar and selects the colour mode to be used. The Calendar updates automatically.
