Cancelling a day of appointments
Why this matters
When a clinic has to close at short notice, for an emergency, staff illness or industrial action, every client needs to hear about it before they travel, and none of them should receive a reminder for an appointment that is no longer happening. Doing the two steps in the right order means a single, clear cancellation message reaches each client and the appointment record shows who cancelled and why.
Before you start
- You need the Send SMS permission to message clients from the appointments list. See Users and Permissions.
- To change appointments belonging to other service providers you need permission to edit them: Can edit All Appointments, or Can edit Department Appointments for your own department.
- Agree the wording of the message before you start. Once the appointments are cancelled, the SMS is the only notice the client receives.
The order: cancel first, then send
Cancel the appointments before you send the SMS.
Automatic reminders are not sent for cancelled appointments. If you send your SMS first and leave the appointments open, a scheduled reminder can still go out afterwards, so a client may get “your clinic is closed” followed by “reminder: your appointment is tomorrow”. Setting the confirmation status to Cancelled by User first stops that, and the selection stays in place for the SMS.
Steps
1. Find the appointments
- Open the Appointments area and select Appointments List.
- Move to the affected day using the calendar at the top of the sub-menu, or the left and right arrows in the toolbar.
- If only some service providers are affected, select Filter, then Users, choose the users whose appointments are cancelled, and select Apply.
- Check the list. Every appointment shown is about to be cancelled.
2. Cancel the appointments
- Select the tick box in the toolbar to select every appointment in the list, or tick individual appointments.
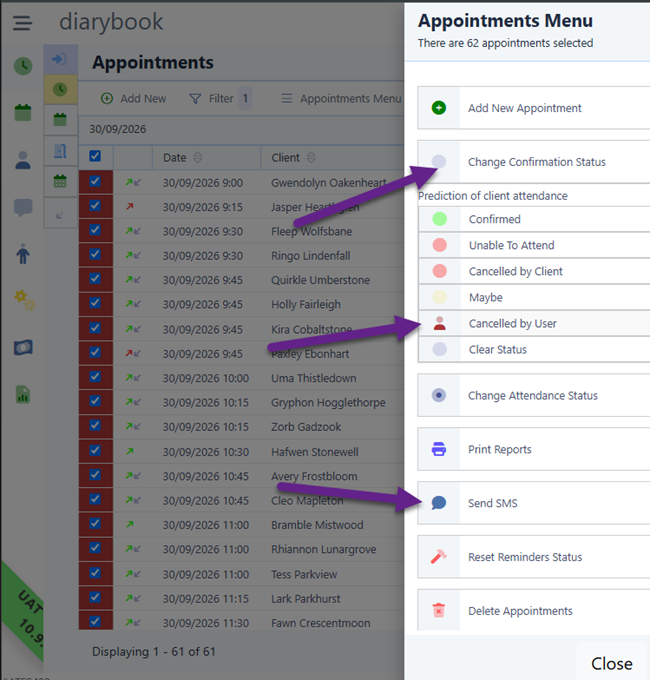
- Select Appointments Menu. The menu shows how many appointments are selected; check the number matches what you expect.
- Select Change Confirmation Status, then Cancelled by User.
Diarybook shows “Confirmation status changed” when it is done. Each cancelled appointment shows a red user icon in the list.
Use Cancelled by User, not Cancelled by Client or Unable To Attend. Those two record that the client cancelled, which would be wrong in your attendance reporting.
3. Send the SMS
Keep the same appointments selected.
- Select Appointments Menu, then Send SMS. The Send SMS screen opens with the clients from the selected appointments as recipients. For a group appointment, every client in it is included.
- Under Sender ID, choose the sender ID. If clients may reply, use the reply option rather than an alphanumeric sender ID. See Sender IDs.
- Under Compose your text message, type the message. Say what has happened, that the appointment is cancelled, and what the client should do next: whether they will be contacted with a new date, or who to call.
- Under Options, set Send When: to Now. Use Later only if you have a reason to hold the message back.
- Select Create Preview and check a few of the messages.
- Select Next. The Send screen shows Total messages: and Total price:. If any messages are rejected, the number is shown under Rejected messages:.
- If the message is long enough to cost more than one part, tick I accept some or all messages are large and will cost extra.
- Select Send.
Diarybook confirms the job number. Select Open Job # to follow delivery in the Messaging area, under Jobs.
What to watch for
A reminder went out before you cancelled Reminders already sent can’t be recalled. This is why the cancellation should happen as soon as the closure is known: a reminder setting with an Hours before appointment trigger can send on the day itself. Check the reminder icons in the list before you send, and make sure your message reads sensibly to a client who has just received a reminder.
Clients received an extra message after you cancelled An Additional Messaging schedule item can target the Cancelled By User confirmation status. If one of your reminder settings has such an item, cancelling the appointments triggers it, and the client receives that message as well as yours. Check your reminder settings before a planned closure such as industrial action, and decide which of the two messages you want clients to get.
Some clients didn’t get the SMS Clients with no mobile number, or who have opted out of SMS, are not sent the message. Look at the Rejected messages: count on the Send screen, and phone those clients instead.
Some appointments weren’t cancelled The tick box selects only what the list is showing. If a filter was left on from earlier, or you filtered by user, appointments outside that filter are untouched. Clear the filter and check the day again before you finish.
Synced appointments If your appointments arrive from another system through Automatic Syncing, cancel them in the source system as well.
Clients who reply to the SMS If replies are enabled, a client’s reply can change the confirmation status. A reply that matches a confirmation keyword can set the appointment back to Confirmed, even though it was a reply to a cancellation. Ask clients not to reply, or use an alphanumeric sender ID so replies aren’t possible, and check the Received screen afterwards. See Synced Appointments for how replies are read.